Showing posts with label Audio Engineering. Show all posts

Wednesday, February 17, 2010

DIY Microphone (More or Less.)

Wow, so it's definitely 2am right now. That's usually not abnormal, but I had a midterm at 9am this morning, which means I've been up for about 18 hours. I'm just going to dive right in.

I've been talking about this microphone for a few weeks now. I finished it last month, and I haven't tested it on any real equipment yet, although it sounds fine through my Bheringer mixer into Logic via 1/8" stereo line input. So, audio engineers, I'm going to tell you how to build a microphone, with exception to the circuit, because I'm not about to explain electronics to you, and you're not about to suddenly understand it.

The microphone that I built was a Large Capsule Side Address Condenser microphone. Long name, but it's big enough to fit on the side. Basically, it looks like a Neumann U87. I fashioned the grill based on that microphone, so it looks quite similar. Before I go any further, I'd like to point out that I'm not an expert at this. This is the first time I've ever looked past the grill of a microphone. Hopefully you're in the same boat, so all this will be informative. Mics shouldn't be scary to understand.

Let's get some of the circuit design out of the way so we can get on to the fun building stuff. I used a condenser type circuit, which means that the microphone is powered by +48V Phantom Power supplied by almost any channel strip or little mixer ever. This means that the circuit actually amplifies the signal of the capsule, which which allows your mixing console to recognize the signal coming in. There's much more to that, but I'm just studying that now. It's not necessary to know it when building your first microphone for fun.

The body of my mic is made out of 2" brass tubing, or kitchen railing. It was easy to cut, and easy to find the bottom of the microphone, which is a railing end cap. I drilled a hole in the end cap to fit the XLR connector through, and screwed that on. On the inside of the end cap, I attached a metal rod that angled straight up. When the end cap was fitted to the brass tube, the rod would go through the tube and end up about 2" short of reaching the end of the tube. Then I soldered a round plate 2" in diameter to the top of the rod, perpendicular, so parallel to the end cap. To this, I screwed on a small flat metal strip, which was bent at a 90 degree angle to continue upward. To this I screwed on a small flat metal strip that was bent into a circular shape, which held the capsule in place.

The grill was probably the most fun. I had to hand bend the brass mesh, as well as roll it on counters, chairs, thick pens, or anything I could find that was the right shape. The right shape was somewhat difficult. To copy the U87, the grill had to come out of a round mic body, and then flatten out into more of a rectangular shape at the top. I took a thicker metal strip and bent it around the top to enforce the rectangular shape, and soldered it to the mesh from the inside. That was difficult, because my soldering iron is weak sauce.

From there I got some black fabric at Michaels, and covered the inside of the grill, apart from a large hole for the capsule. I didn't do this for any other reason than look, and to be honest, it looks awesome. Other than that, I had to screw the end cap to the tube, and that was probably the hardest part, because you have to tap the end cap, and also countersink the screws into a really thin tube. So, of course, I only have one screw instead of the planned two, because you really can't tap with brass, and so now part of that screw is still stuck in there. I just about threw the whole thing across the garage.

Here is the mic, strapped onto a tripod with a velcro strip. Very ghetto, but I just ordered a shock-mount yesterday, so it should look a little more professional after that.

I tried it on several instruments, and I concluded, through the gross little set-up I had it running through as described earlier, it sounds best on the cello. The capsule has a slight raise in the frequency spectrum around 5-10KHz, and it has a good low frequency response, so it picked up the fundamentals of the cello as well as the friction caused by the bow.

Overall, this mic sounds "OK". That's my official rating until further testing. I'm not going to be a fool and believe everything I make sounds amazing. I'm comparing this against the best microphones on the market. It fairs ok, to say the least, and I'm very pleased with that, for not having a clue what I'm doing. Seriously.

I'm already planning on the SX-II, this being the SX-I. (No, that doesn't mean Sony X-plode.) The SX-II is going to be a phantom powered tube microphone, so it won't need an external power supply. I'm working on the schematic now, and it's coming along quite nicely. As far as look, it's going to be a combination of the Neumann M149 and the Blue Woodpecker. This microphone I will know what I'm doing. Since the SX-I, I've been studying microphone design and condenser microphone circuits. 


So, folks, I venture on, preparing myself into a weapon of knowledge against the vast darkness of the unknown.

Goodnight for now,
-Steve Xavier

Friday, February 12, 2010

Every Decision You Make Is Art

Yesterday morning at around 3am I woke up and headed off to my personal session I booked regarding The Howls, as seen in earlier posts. This session was a re-amping session, and I'll briefly explain that before I move on. Re-amping is basically taking a recorded sound and running it through an amp, miking the amp and recording that as a new track. I didn't use amps and microphones though, but pre-amps. I was able to get away with this because of the way that Digidesign pre-amps are made, which are very "invisible", and don't add much tone to the sound. If you record first with a pre-amp that doesn't add a lot of tone, then you can do more with it later, like send it through another pre-amp, which is what I did yesterday morning.

Anyways, I sat in the studio clicking the chicken head knobs up and down to get whatever tone I desired. It was my unannounced artistic feel that led me to each decision. Drive the pre's, back off the pre's, which frequencies to use on the Germanium Tone Controls, and EQ on the Neve 1073. While the musician/client is always in mind, and what I am doing is only emphasizing what they want, without anyone there with me at that stupidly early hour of the morning I am artistically visualizing what I think the client wants. Also, I had my "so what" moments when I felt like the pre's were driving too hard for their taste. It sounded awesome to me.

From the moment you set up a microphone, your name is all over that recording, no matter who is spittin' over those fat beatz. The level that you commit to multi-track, the amount of compression, or EQ, it's all you. These things are subtle, definitely, but over time they amount to a giant signature, and no one else can duplicate it. Every year, during a certain season at a specific time of day under exact weather conditions, people come with all of their camera gear to the exact spot where Ansel Adams took one of his famous photographs of Yosemite and the Half Dome. I can guarantee you that even if someone where there with Ansel Adams with the exact same camera and film even, they would not be able to produce the same photograph. If you want to be like Ansel Adams, don't join the hordes of photographers to take pictures just like someone else, but go off in your pick-up truck that you fashioned into a dolly of sorts and live photography.

The same holds true for recording. You can't make your tracks sound like his or hers. You may have the same style, but striving to be someone else will only hold you down. Great leaps in art are made by people doing something completely different. This is up to you, I suppose. Do you want your tracks to sound like radio trash that has no feeling or life left after it's been pushed out of the beat-detective and auto-tuning tube, all factory ready? Or do you want to alter the way people think by employing such heinous techniques that people would only see it as pure genius? Alright, maybe not heinous, or pure genius, but different, and skillful. We're still engineers here, so let's not get carried away, but the principle still remains.

So now I hope you can go out into the world of audio engineering and define you. I thought up a really good analogy for this earlier today, but I just watched a Mystery Science Theater 3000 and completely forgot.

Wednesday, February 10, 2010

Knowledge Is Power! (Inspired by Melissa Rodwell)

My safari homepage is a fashion photography blog by Melissa Rodwell. (Very random, I know, but I am an amateur fashion photographer.) Today she posted a blog about knowledge, and understanding fashion photography to it's fullest. Not only fashion photography, but fashion itself. She named off all these types of clothes that I didn't know and talked about Coco Channel. I suppose it's time that I talk somewhat on this subject as well. (Not fashion photography, but understanding the industry in it's entirety.)

How does this apply to the audio engineer? There are a few different aspects of audio engineering that we have to fully understand to become masters of audio. (Like Bob Katz.) What I'm saying is that the knowledge that audio engineers should have, more or less, is the understanding of how a sound is produced, transduced, manipulated and arranged from beginning to end. This attention to detail separates the bed-room enthusiasts from the Jedi's of recording. Jedi's, yes. More like bed-room padawans than enthusiasts.

First off, the reason you wanted to become an audio engineer, hopefully, is music. (I know I'm forgetting about all you Post-Production people right now, so imagine that I'm talking about sound in general.) Now, music in and of itself is a vast and extensive subject that requires years of study to start to comprehend it. Your understanding of music will help you to mix a band more logically according to the arrangement and genre. You are the invisible conductor, so if you don't know anything about the music that you are mixing, how will it turn out sounding good? The music is the first thing that you have to focus on, and the most important thing! Sufjan Stevens has recorded several albums with techniques scoffed at by the religious right of the recording industry, but these techniques promoted his music and his over all sound in an impressive way. First, music, then engineering.

The next aspect that I want to look at is the sound itself, or the acoustics of audio. Each one of these topics could be a blog themselves, but I'll save expanding upon them too much for a later day. I've got a deadline with this one. As an engineer you absolutely need to understand the sound that is produced by each instrument. Several times I've seen people make their microphone lists without ever hearing the instrument, then when they go to record, they set up the mics on the instruments without hearing them played! This happens, and it's downright stupid! Understand where different tones are produced on a guitar, and how to smooth out an amplifiers punch or emphasize it. Know how to affect certain things, like drums, and why the pitch bends up or down after the tom has been struck. Understand how sound travels, how it bounces, and be able to manipulate it's path with different surfaces such as baffles or gobos. When you understand how instruments are creating the sound, and how that sound is reacting within the room, only then can you decide which microphone would best suit the instruments musical needs.

Which brings me to microphones, gear, and signal flow in general. This is something that you can understand on two levels: 1. How it will affect the sound, and 2. Why it will affect the sound. The first is on a tonal level. Neumann microphones will give you tons of presence, tube gear will give you a "warmer" sound. The second level is more of an electronic understanding. Tube gear will actually roll off transients because of the nature of the electrons passing through the tube, therefore de-emphasizing a portion of the signal with the most high-end information, giving you more low end which to your ear will sound "warmer". Just a side note, this is why solid-state sounds harsh, but in reality, solid-state is a truer representation of the input sound. Anyways, understanding your gear is a very important thing. As soon as you get a new piece of equipment, test it with all you have, to it's limits. Know how the gear will handle in every situation.

There is still so much more in audio that can be learned, I haven't even started digital, but because of time, and for the sake of this post getting too lengthy, I'll stop there. What you need to do, if you truly are an audio engineer, is understand every aspect of audio, not just beat-making. I guess my point is this; you have to get in the water completely before you learn to swim.


"Wait a minute," you say, "what makes YOU an engineer?"
Um, obviously the legit cardigan.
In the words of my Advanced Recording and Production instructor George Borden, "Feel it."

Friday, January 22, 2010

Listening Levels


I just saw a little clip for the upcoming news show the other day where a guy was driving in his car listening to music saying something like, “Does your cat make too much noise all the time???” Haha, I’m just kidding. No, he was asking how loud was too loud?
Sitting next to this guy at the airport where I can hear his headphones reminded me of this, and I want to let you in on this. The news reporter said something about hearing what the experts are saying, at 10, so I suppose that makes me an expert. I will continue this post as such.

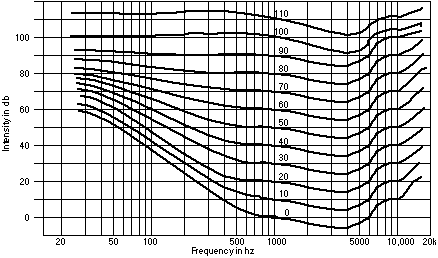
All mix engineers, hopefully, know that 83dB (decibels) is the best volume to mix at. This is measured in SPL (Sound Pressure Level), and can be accurately read by an SPL meter found at RadioShack. (The last time you’ll hear me saying something nice about that store.) Engineers mix at 85dB not because they won’t lose their hearing, but because it is the flattest frequency response. (What does that even mean?) I’ll tell you.

People hear frequencies better than others at certain volumes. If you turn down your stereo, you can hear the vocal range and snare drum much better than you can hear the bass, or the kick drum. When you turn it up, everything changes. The fact of the matter is that it does sound better at louder levels, but go too loud, and it won’t be an even level again. “Frequency Response” is the term engineers use to define how different a sound changes from it’s original sound to how it sounds coming out of your speakers. Most manufacturers of consumer speakers will change their frequency response to make you think they sound better than other speakers.  They’re not necessarily better speakers, but they’ll emphasize frequencies that bring out certain things in pop music, like vocals.  A flat frequency response should be desired, which means that no frequencies are emphasized or de-emphasized, and you are hearing more or less exactly what the mix engineer and mastering engineer intended for you to hear. These speakers are usually very expensive.

The Fletcher-Munson Curve is a chart which plots out which frequencies are best heard at certain levels in relation to the other frequencies at that level. It’s confusing, but here is the Fletcher-Munson Curve.


The flattest frequency response according to the Fletcher-Munson Curve is 83dB, which is why mix engineers mix at this level. It also happens to be about the loudest level you can listen to for an infinite amount of time without any hearing loss. If you are listening to music at 85dB, you can carry on a loud conversation with the person next to you comfortably. At 90-95dB, you can’t listen to music for more than 8 hours, or else you’ll start to damage your hearing. 115dB, or rock concert loudness, will damage your ears in less than an hour.

It is very common for people to listen to music too loud in their cars. The roar of the engine combined with the road and the wind already make the car a noisy place. Drowning these out with music will easily get you up to 90dB. Add in the fact that you’re in a small, enclosed space of flat reflective surfaces bouncing back that music, which is trying to compete with volume of your voice bouncing straight back in your face, and that level can easily reach 100dB if not more.

Be careful out there. You don’t want hearing loss, or tinnitus. Wear earplugs at concerts, don’t roll the windows down when you’re on the freeway, turn your earbuds down when other people around you are bobbing their heads to the same beat.

Wednesday, January 20, 2010

Another Day With The Howls

Saturday I flew in from SF, went to lunch with my family and got straight to work at John's house tracking his guitar parts. Everything went rather smoothly. I mean, as smoothly as it can go with an old upright M-Box with the face falling off and the headphone jack coming out of the side.

Well, what else can you really do? I sat there, on an old Mac running Pro-Tools 7 with one processor of 1.67MB of RAM, which maximum capacity was recording 1 track of audio for 5:30 minutes before it crashes. I figure, without limitations, what summons creativity?

So I got some of the best guitar sounds ever. To be honest, I wish I had a Sennheiser 421 to get the lower end sounds of the guitar amp to recreate the "warmth" that they wanted, but the SM57 worked just fine. And in the end, who really cares?

We recorded Boaz's guitar Sunday. The tones I was getting from him with just a 57 were killer. Some tracks I used a small cap condenser on, but for the most part, the 57 carried most of the weight.

I realized something while I was sitting there, in a bedroom, in an apartment a few blocks away from the beach, with equipment that I probably wouldn't even have the heart to give to someone for free (for the purposes of audio recording). I realized that I honestly didn't care what equipment I had, it sounded good because this was real music. I'm sure I will rarely experience that in a professional career as a producer. There we all were, with our Arizona green tea and our M-Box, just ready to rock.

I was in the heart of American music. I am working desperately to capture its sound and deliver it to you uncontaminated by greedy hands by this summer. (Oh what a deadline...) By uncontaminated, I mean I am free to give The Howls exactly what they want without a company breathing down my neck as I mix. (I've had people breathe down my neck as I have mixed before, it's not good.)

Today was more relaxed. John and I were at it again, but this time it was just him and I, recording his vocals in his room behind windows pattered on by the evening rain. I fashioned a pop screen out of a coat hanger and some nylon tights in about 2 minutes flat. (I've never done that before, but I've heard it works. It does, really well actually, but it looks so stupid.)

It's really amazing to see these things come together, and probably my favorite part as an engineer. When you begin a session, you start setting up mics to capture the best sound, and you record these parts, and parts and parts, and keep making them sound good. For me, when the singer records his/her part, it becomes a song for me, and that's so cool to see. An artist unfolds an idea right in front of your eyes, and it comes to fruition. What amazed me more was how killer everything sounded. I mean, this was a bedroom, with 6 different mics, and an outdated M-Box with the guts spilling out, and listening on some old computer speakers that you probably remember playing Command and Conquer on.

Wait till I get The Howls into a studio.


In other news, I hand-crafted the grill to my microphone today, and found out that the most important part won't arrive while I'm home, which really annoys me. That's ok. I'm still missing parts. I think I'll be done if I work hard on it tomorrow.


Tuesday, January 5, 2010

Home Recording

Last Saturday I had a great day recording Dave, drummer of The Howls. It is so nice to work with professionals!


Speaking of professionals, all the pictures here were taken by Corinne, Dave's girlfriend.


Alright, so here's the thing, I'm tired of always teaching and writing crazy "How-To" blogs. This one will strictly be photos and small explanations of what the photos are. If you ever want your drums to sound like The Howls, this blog will help, but I'm not going to teach you how I did it.


This is Dave getting all set for recording! He was taking his time tuning his drums to sound perfect, and I am so thankful. You can see here the subkick on the kick drum that I made out of a speaker cone. If anyone is interested I'll write a blog on how to make one. You can also see here my general recording set up.


Here's how it went down. My dad and I went out to Lou's to get some light bulbs and hardware for the microphone I'm building about a half an hour before the session. Maybe 20 minutes before the session, Dave tells me that we can't use the Firepod as planned, which would have given me 8 channels into Logic Pro. I was planning on using 9 microphones, but now I've got (basically) 1 input to Pro Tools, the M-Box2 Mini. Using the mixers in this picture, and the trick I posted on syncing Logic to Pro-Tools, I managed to pull 4 channels pretty much out of thin air. 6 mics into 4 channels, and it sounded AMAZING!


Here you can see the mixers and how I used them. Maybe not how I used them, but that I did indeed use them. We just set this all up in my parents living room. It actually turned out really nice sounding.


Here are some more photos from the session. Over all I had fun. It was such an awesome and productive day. Be on the lookout for The Howls new album coming out this summer!


And finally a shot of me that I for once didn't take. 


Again, The Howls, working on their new album that will be out this summer!


Also, not this recording, but an earlier home recording of The Howls that I did can be heard at my myspace.


-Steve


Friday, January 1, 2010

Pre-Production

Today I worked with a band through pre-production. I have no idea how many readers I get who want to be producers, but if you do want to be a producer, or an engineer, listen up! Pre-production is one of the most important things you will ever do, and I will tell you why.

What do you even do in pre-production? In pre-pro, you have to ask the artist what their vision is for the project. This is based upon a few things.

Sometimes the producer will help an artist through rough spots in their songs. Luckily for me, I didn't have to worry about that. This is potentially a super hard thing to do. Artists, like anyone, are really touchy about their work, so you need to be gentle. Suggest, don't force, your ideas. A good producer says, "Why not?" more than, "Why?". Always keep the project in mind. With that, I glide ninja style through a segue that carries me to...

The project. (sneaky) This is the theme. Answer questions like, "What is this album trying to convey?" and, "What sort of sound/feel are we going for?". As producer you are considered responsible for the sonic quality of the recording (and legally obligated to do so if you sign a contract with a label). Write all this down! Never lose the vision of the album. Sure, this can change, and the songs may change once in the studio, but without this, you are nowhere. Ask the band for reference tracks. (Ooh, that's the first time I've ever italicized something.) Reference tracks are songs that the artist wants to sound like. These will be extremely helpful for you when you are recording/mixing/mastering/eating/sleeping. Actually, while I write this, I'm listening to reference tracks, like a multi-tasking maniac. Anyways, you need to know what the artist wants. That is why you're working with them in the first place. You are the servant of servants. You serve the artist, they serve the fans. Get 3 or 4 reference tracks, at least one from every member of the band. If the bass player says he wants to sound like James Jamerson from Motown, you go and listen to any song Jamerson has played in. There are limitations as to how well you can do that with a microphone and processing, depending on how well the actual instrument sounds like the reference track, but if the band is trying to reach the same goal as you, it should be fine. For instance, I've got a drummer who wants really dead toms. I can't do that. That's completely up to him to figure out how to do that. But if he gets the sound he's looking for and says he wants to sound like John Bonham, then I'll pull out 414s, employ the Glyn Johns technique with some U87s for room mics. (Make sure he's beating the drums like they owe him money.)

The next thing that I would like to address is the long term business plan. What are you planning on doing once the record is complete? This may help you decide how many songs are going to go on the record, and also help define the general feel of the record.

Meh, I'm tired. Sorry readers. I think that's enough for one post. Tune in next time to hear about recording. Also, coming up, how to build your own microphone.

Sincerely
Steve.

Wednesday, December 16, 2009

Syncing Logic Pro to Pro-Tools

Hey nerds.

In this blog post I'm going to show you in detail what I did today. I took on the task of syncing Logic Pro (8) to Pro Tools (8). I got a little side tracked, and I'm going to show you an example of how that happens to me.

Speaking of side-tracked, here's something (sort-of) cool. http://trendfo.com/vu_meter_c is a blog, or collection of blogs about VU meters. I found my blog on there! So at least people are getting use out of my random postings. Let's get back to it, shall we?

SYNCING LOGIC TO PRO TOOLS LIKE NOBODY'S BUSINESS

Alright, so let's start with the Pro Tools side. Open up your session and either at the start up window or if you hit "Command-(numeric pad) 2" change your startup timecode to be one hour. If you're doing music production set the frame rate to 30-ND (for non-drop cause we're not snoop dog) which is for music, unless you're doing NTSC video in which case you will choose 29.97. Choose your bit depth and sample rate (remember, multiples of 44.1 for audio and multiples of 48 for video) and honestly I don't really care what it is, just remember what you chose. Moving on!

Actually, I skipped a step, but it doesn't matter as long as we remember to do it now. Go to the Audio/MIDI Setup found in your applications folder and enable the IAC driver. Make sure the driver is online and the IAC Bus 1 has been created. You can create more if you'd like. It's fun.

Alright, so we've got the bus through which our SMPTE timecode will be transmitted from Pro Tools to Logic. Inside of Pro Tools, go to setup>peripherals>synchronization. Set both the MTC Reader And Generator Ports to the IAC Driver, Bus 1. I don't really know if you need to do both of them, but I figure it doesn't hurt. You probably only need the generator port, but in case we're trying to slave Pro Tools instead of Logic, we'll need the reader port to be Bus 1.

Now we've got our MTC Generator all set up to generate SMPTE timecode at 30ND starting at one hour. Open the transport window "Command-(numeric pad) 1"and click on the disclosure triangle on the upper right hand side, make sure "synchronization" is checked. Click the GEN MTC button so it turns blue.

Logic time:
Go over to Logic, click Settings>synchronization. Under the General tab, which will be the first to pop up, set the sync mode to MTC, the Frame Rate to the same you did in Pro Tools (30ND) and set the "plays at SMPTE to one hour, just like we did in Pro Tools. We have almost arrived. Control click the transport bar and click the pop down menu that says "Customize Transport Bar...". In there under "Modes and Functions" enable Sync. Click ok and go and press the Sync button in the transport bar. The bar ruler at the top will turn a nice blue color. Press play in Pro Tools and Logics transport will follow!


Why the heck would I do that?
I don't know. I've done it before in a pinch when I needed more inputs and all I had was a firepod. Anyways, the reason I wanted to do this in the first place was to play Logic's instrument plugins while working in Pro Tools. So this is what I came up with after much Google searching:

MAKE LOGIC YOUR SLAVE WITHOUT EVEN USING IT

I don't like using Logic that much, but it's got some pretty sweet plugins. They just sound better, but who wants to work in Logic unless they're a musician or a circuit junkie?

Logic Pro comes with a program called Mainstage that tries to act like Digidesign's Eleven, or Native Instrument's Guitar Rig, but it's like comparing Photoshop to iPhoto. Anyways, it will work for our purposes, you don't need to even run Logic. Logic is a giant CPU beast anyways.

Using our IAC Driver Bus, we can route the output of a new Instrument channel in Pro Tools to whichever IAC bus we want. I don't like using bus 1, since that's my timecode bus. Just make a new one and name it whatever you like. The input is set to all on my machine because I only have 1 MIDI device. Set up your Logic instrument of choice by making it the input of your channel strip. You can make as many as you like. (remember though, unless you use the split keyboard function, they'll all receive the same MIDI information, but you can route them to different outputs.) So in Preferences, make your output the Digidesign whatever you have.

Here comes the headache. Unless you've got something that has more than "output 1-2" on it, you can only record back into Pro Tools 2 mono channels or 1 stereo channel at a time. If you have 3-4, 5-6 or whatever, you have more options to chose from, including the option to continue listening to your Pro Tools stereo output 1-2 while recording the outputs of different MIDI instruments. Basically what you do is patch the input to the output, and record it in Pro Tools. In Mainstage, route the outputs of the different instruments to separate outputs, and record them back into Pro Tools using the physical output to input connection.

If you can manage to do that, you're awesome! Basically you can record all the MIDI you want into Pro Tools, and on new Audio tracks monitor or record the output of Mainstage's channels using Logic's plugins.

Yeah, ok, I'm done. There is nothing else I would even consider wanting to do between Logic and Pro Tools now. Unless you want to bus audio between the actual two programs, at which point I say, "No." (But you can...)

-Steve

Tuesday, October 6, 2009

Le Electric Guitar: Electronics

I devised these sections up really weird. A whole post devoted to pickups? Well, at least you know pickups really well now. That means I can get started on electronics.

With your standard Fender Telecaster, you'll have a volume knob, a tone knob, and a 3 way selector switch. I believe Strats have two tone knobs, one for the neck and middle pickup and one for the bridge (which is just stupid, but someone thought that was a good idea.)

Ok, first off, let's take a look underneath the pickguard and control plate. (Again, I am modeling after the Telecaster, but principals are still the same.) Here you'll see all the things that will make you want to be extremely careful.


I love the control plate on the telecaster, because you can get to almost all of the electronics without taking off the strings or even the pickguard. To the far left, you see the tone knob, followed by the volume knob in the middle, and the tone knob on the left. A very common thing I find is that the potentiometers (volume  and tone controllers) come loose and wiggle. All you need to do is pop off the knob and tighten it with pliers on the nut and your fingers holding the other side.

Some knobs are screwed on by a little screw in the side. You can see one in the picture. These don't pop off. You get a tiny flat head and loosen the screw and it comes off very easily.

Moving on! What makes the volume knob volume? A potentiometer is a variable resistor, which means you can control how much signal it is stopping. If the volume knob is turned all the way up the signal flows freely and as loud as possible. When the volume is turned off, the potentiometer is sending all of that signal to ground (anything metal, as long as it is connected somehow to the other grounding points) so that no signal is coming through. The way the signal increases or decreases depends on the type of potentiometer you get. (I recommend 250K-500K Ohm Audio Taper pots.)

Tone! What is actually happening when you turn the tone knob? Well, it's actually very similar to a volume knob, except one thing. Instead of sending signal to ground when the tone knob is turned all the way down, a capacitor is connected to ground so that all of the signal is filtered through it before it's sent to ground. This will filter out the high frequencies, which some people like. The amount of high frequencies you cancel out depends on the capacitor. (I recommend a 47uF capacitor. Not too much, not to little.) When the tone knob is turned all the way up, no signal is being filtered, so you hear the untampered signal coming straight from whichever pickup is selected.

Wiring 2 pickups to a 3 way selector is easy. The way telecasters are wired have the neck on position 1, neck and bridge on position 2, and just bridge on position 3. Strats are basically the same, but with 3 pickups and a 5 way selector switch. Neck on 1, neck and middle on 2, middle on 3, middle and bridge on 4, bridge on 5. The way you wire this is simple. First take your selector switch and place a wire connecting the two top left and two bottom right tabs on the selector switch. This wire will go to the volume potentiometer. After that, the neck pickup positive wire (colored) goes to the top right tab, and the bridge pickup positive wire goes to the bottom left tab. (This way when you select position 2, the wire going to the volume pot will be connected to both the neck and the bridge. Then wire all of the ground (black) wires to ground. (Usually on the top of a potentiometer.)

Much easier in a picture.

Now, we have almost everything wired up. I still need to explain this grounding concept. When your guitar is improperly grounded, it will buzz unless you touch anything metal on it. This is because the circuit completes its grounding by using you as it's ground. A circuit needs large amounts of metal to send all of it's unwanted signal to.

Everything you connect to "ground" has to be connected together. So wire the tops of each potentiometer to each other. Wire the capacitor for the tone knob to the top of the tone potentiometer. Wire the ground prong from the volume knob to the top of the volume potentiometer. Wire the ground wires from the pickups to the top of the potentiometers. Wire the shield from the input jack to the top of a potentiometer, and wire the top of the potentiometer through a hole in the guitar to be squished underneath the bridge plate. This connects the ground to the bridge, the strings, the tuning pegs, and all things metal on the guitar.

Ok, last thing here. How to wire the actual guitar signal. Wire the tip of the input jack to the middle prong on the volume potentiometer. The left prong on the potentiometer should have both the wire from the selector switch and a wire connecting to the left prong on the tone potentiometer. (I'm just describing the schematic shown above, basically.) Middle prong of the tone knob has a capacitor connecting to ground.


Ok, I think that's it as far as standard electronics in the telecaster.

If you need different schematics, this is the place to go: Guitar Electronics

I'll do part two of electronics if you'd like, going over advanced wirings with humbuckers and stuff like that. Email me for suggestions, or follow the blog and leave a comment!

Sunday, October 4, 2009

Le Electric Guitar: Pickups

I am starting a series on instruments, because I know many people who play instruments well, but don't understand the instrument itself. Here I'll offer brief explanations on how to fine tune it, whether that be electrical or physical adjustments.

I'll start on the electric guitar, since many many many people play. Also, you pianists don't have to adjust your instruments much, and drummers, you have bigger worries. (Though I wish I had the privilege of parking in handicapped spaces...) I'll get to you guys later, don't worry!


Alright, let's start with all the general parts of the guitar. I'm going to refer to the Fender Telecaster, since I have more experience with those than any, but these general rules apply to all electric guitars. From top to bottom we have:
  • Headstock - includes tuning pegs and usually access to truss rod adjustment
  • Neck - includes frets which are more important than you think
  • Body - composed of roughly 3 parts: Bridge, Electronics, and Pickups.
I feel like that covers the basics. Part 1 will cover the first question you'll encounter when telling someone about your guitar. What kind of pickups do you have?

Pickups
How do pickups work? Well, pickups are just magnets that vibrate when the string is played. A guitar string doesn't move back and forth, per se, but rather in a circular motion. However many times the string completes a full circular rotation in a second determines the pitch. If the string is completing 440 rotations a second, that is called 440Hz (Hertz) or in musical terms, Concert A. The magnets will "pick up" (can't get that out of my head) on these vibrations. There is a separate magnet for each string. A coil is wrapped around the magnets to pick up their vibrations. A magnet moving back and forth through a coil creates electric current. This electric current is what is amplified.

There are two different types of pickups. There are single coil and double coil (or humbucker). The single coil is a standard pickup, found in most Fender guitars. For instance, the Stratocaster guitar has three single coil pickups. The original. They gave that thing steroids, and it's got like, ten arms now.

The humbucker is more common in rock or heavy metal. Basically instead of a single coil, it has another one right next to it. The whole ideology of the heavy metal genre. (So if you're not playing an Ibanez or a Jackson, get out, n00b.) There are way more possibilities with humbuckers when you wire them up. You can actually wire the toggle switch to switch between single and double coil in just one pickup! (Insert nerdy excitement.) I won't get to that until the electronics section.

What makes a pickup "hot" is the magnet type. The stronger the magnets in the pickup, the better it will be able to read the vibrations of the string.

A common misconception is that any metal (or anything for that matter) touching the pickups at all will hurt the guitar. Nope. You can touch those things with metal all day. Just don't have the amp turned on. That's really what you're ruining.


Ok, I think I've talked enough about pickups. Next in this series will be about how to put the pickups in and the electronics behind all those knobs! (One of my better segues.)

Friday, October 2, 2009

Do It Yourself - a stereo

Ok, I'm super tired, but wanted to show you a few things you can do if you have a pair of speakers and an old radio or something. (You do not need a tape player, that's just where I got the speakers from)

Recently I came upon the obsession of tape machines, like this one. I had to buy another one so I could fix this one.

The other one was pretty cool, but didn't have the functions I wanted. It had two speakers (sort of rare) on either side of the tape machine. So naturally after I stripped the tape machine of its parts to fix the one above, I just took the whole tape machine out and decided to build a stereo w/ FM/AM capabilities. The tape machine left a pretty good size space, which would be able to fit records. I needed to put in a control surface where all the electronics hide, so I decided that would go vertical on the left so the records could still all fit.


The second tape player above is the one I took out and left the speakers. Now, since I didn't feel like stripping out all of the individual circuits from the tape machine to compile an auxiliary input as well as a radio, I just decided to go to Urban Ore (thrift store) where I got the tape machines and buy a tiny radio. Remember, the only thing that I have left of the tape machine to the left is the speakers. The middle part is all gone and sitting in an ugly junk like pile on my work bench.

After I pulled that thing out I noticed a schematic of the machine glued to the wood behind it. A lot of help that did me... Well, actually, it did help. I'll get to that in a bit. First let me tell you how I turned the radio/cassette player into a radio/stereo input.

On top of this little radio was a cassette player, so I ripped that off and cut the wires. (Maybe a little more systematic than that.) I noticed that there was no on button for the tape player, but when you pressed play, it would connect the power and turn the player on. I soldered these together so the unit was always on. The radio would switch on when you switched from tape to radio. So now I had to take the input of the power and run it through a switch that I stripped from the tape machine. Actually, that's not true, I found a switch in the back that toggled between A/C current and D/C current (wall powered or battery powered) So I took  that switch and used it as the power, since there would be no batteries, the unit would automatically shut off. It probably would have been better if I did what I mentioned before, but who really cares.

The next thing I had to do was take the input to the tape machine and connect an 1/8" stereo jack (headphone jack perhaps). This was pretty easy, but then I realized that the difference between tape and a direct input was about 50+dB (volume doubles every 3dB, so this was about 2^16th (65,536) times as loud as I wanted it to be.) This resulted in a very loud input, and it would distort if anything was over the quietest level known to man. Since I knew how to make a 20dB pad off the top of my head (-20dB) then I just made two so that the signal would reduce by 40dB. (So since we had 50+dB coming in, and I turned it down 40dB, the level is still loud coming in, but not unbearable.)

How do you make a 20dB pad? (You can definitely skip to the next paragraph if you don't care.) Simple. A quick answer, two 1K ohm resistors in parallel while you bridge the two with a 150 ohm resistor on the outgoing side. Know that I think about it, I do know the exact math and should have just made only one pad, of 50 or so dB. Anyways, here's the math, have fun; Attenuation = (R1 + 2(R2)) / R1. Attenuation, by the way, just means turned down. So my pad will attenuate by 40dB.

Oh, something I forgot to mention, I just hooked those speakers from the tape machine up to the wires that were connected to the radio speakers. (You NEED to get a radio and/or cassette player that has two speakers, otherwise there are not enough amplifiers in the circuit and you will either have mono or nothing.)

I felt like this wasn't enough, so I took the VU meters from the tape player (You can see them if you click on the image) and tried to put them in. This is where that old schematic came in handy. Turns out you can't just put those things on the plus and minus wires of each speaker. You can if the speaker isn't attached, but then what's the point, you're monitoring a level that you can't hear. So you have to build a VU meter amplifier, something I took WAY too long to find. The tape machine had a less than perfect solution, which was a diode on the positive side of the meter and a capacitor stretched from positive to negative. Unfortunately, this thing was so old that I broke exactly 1 diode and 1 capacitor in the process of removing them. Radio shack sells diodes and capacitors for about $120981209383410 each.

Let me say this; if you don't build the proper VU meter amp, you're meters will not register the correct frequencies and they will NOT be accurate. This was just a project for my girlfriend, so I stuck a little diode on there without the capacitors, and now the meters read about 64Hz, which is about the lowest frequency a kick drum makes, so those meters bump up and down nicely to the music, and overload if there's anything too bassy that might hurt those little old speakers. You can find a proper VU meter amp here.

So that ended up looking something like this.

This picture doesn't show the VU meters properly attached. I didn't put them on the speaker wire, but rather off of the output jack from my radio/cassette player circuit. A headphone jack isn't useful in my case because anything that will be playing through those speakers will come from the headphone jack of the source, i.e. the record player preamp, the ipod, etc.


Well, it looks like a mess, and I still need to put it all together, but it does work, and I'm very happy!


P.S. I majorly burned myself with the soldering iron and cauterized my skin almost instantly. Please be extremely careful while doing any soldering. Always keep a window open and a small fan going so you don't breathe in the solder fumes. (You'll have the worst headache of your life, trust me.) And for those solder burns, always have Melaleuca oil sitting around because that's the worst burn I've ever had, but the combination of cauterizing it and applying the oil relieved all of the pain. I could poke it in 15 minutes and not feel a thing.